TL;DR
A closet can become a surprisingly good recording space if you focus on strategic placement, proper acoustic treatment, and ventilation. Moving the rig away from your workspace and sealing gaps has a bigger impact than foam alone.
Ever tried recording in a tiny closet? It’s noisy, cramped, but surprisingly effective—if you know what you’re doing. The biggest secret isn’t just slapping foam on the walls; it’s smart placement, sealing gaps, and ventilating properly. This guide will show you how to make your closet a quiet, professional-sounding space without breaking the bank.
You’ll learn why distance beats absorption, how to treat reflection points, and the one thing most setups overlook—ventilation. Whether you’re recording vocals, voiceovers, or just want a quieter workspace, these tips will help you get the best sound in the smallest space.
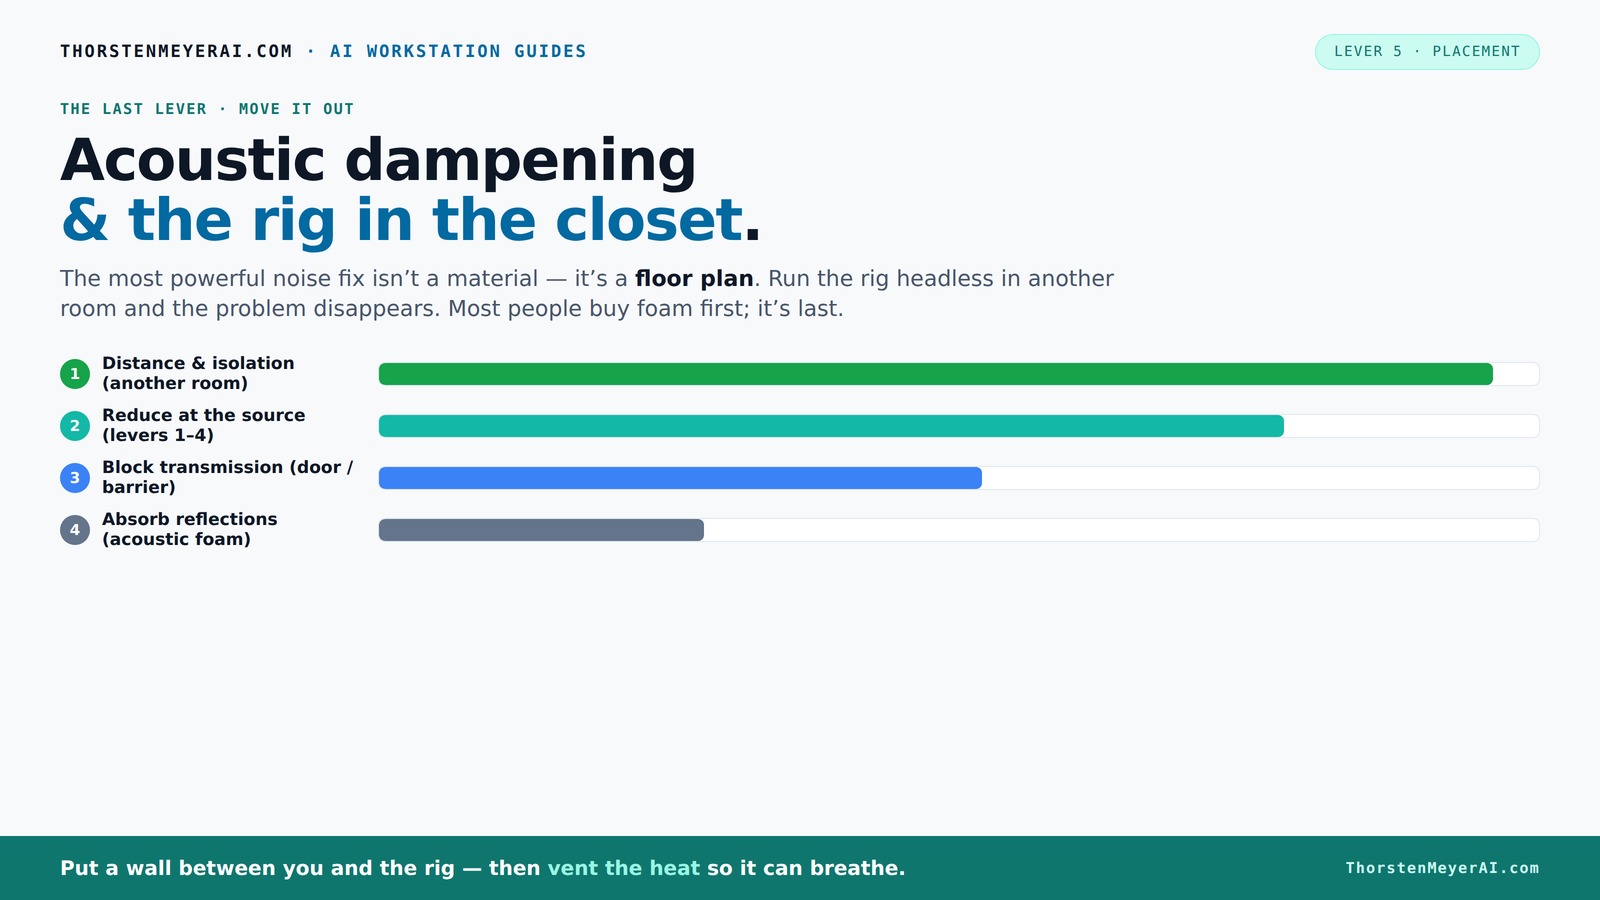
Acoustic dampening
& the rig in the closet.
The most powerful noise fix isn’t a material — it’s a floor plan. A rig you can’t hear because it’s in another room beats any amount of foam. Tap the approaches in Part 1 to see what actually works.
(another room)
(levers 1–4)
(door / barrier)
(acoustic foam)
Contain the noise, not the heat
Key Takeaways
- Distance and proper ventilation are more effective than foam for noise reduction.
- Treat the first reflection points and behind the mic for clearer recordings.
- Seal gaps around doors and vents to prevent sound leaks.
- A well-ventilated closet with active airflow prevents overheating and noise buildup.
- Bass traps and strategic placement tame low-end issues in small spaces.

Focusound 52 Pack Acoustic Foam Panels 1" x 12" x 12" Sound Proof Foam Panles Soundproofing Noise Cancelling Wedge Panels for Home Office Recoding Studio with 300PCS Double-Side Adhesive
Soundproofing - Acoustic foam panels triangular grooves structure for better noise absorption, helps to reduce and absorb unwanted...
As an affiliate, we earn on qualifying purchases.
As an affiliate, we earn on qualifying purchases.
Why Your Closet Is a Secret Weapon for Sound — When You Use It Right
A closet isn’t just a storage space. It’s a mini acoustic chamber—if you treat it properly. The dense clothes, soft fabrics, and small size make it perfect for dampening reflections and echo. But it’s not just about stuffing it with blankets; placement and ventilation are key.
Think of your closet like a tiny studio booth. When you position your mic correctly and add some soft materials, you can get a clean, tight sound. It’s a budget-friendly way to produce professional vocals or voice recordings right in your own home.

VEVOR Portable Vocal Booth, 6.56 ft Height, Portable Recording Studio with Travel Bag, Mobile Tablet Stand, Thickened Soundproofing, Sound Isolation Booth for Echo-Free Vocals, Podcasts, Voiceovers
Say Goodbye to Echoes: Built with durable Oxford cloth and acoustic padding, this recording booth for the home...
As an affiliate, we earn on qualifying purchases.
As an affiliate, we earn on qualifying purchases.
Acoustic Dampening vs. Soundproofing — What’s the Real Deal?
Acoustic dampening is about reducing echo and reflections inside the space. Soundproofing blocks sound from leaking out. You’ll often see foam panels and blankets used for dampening, but they won’t stop noise from escaping or entering.
Understanding this distinction is crucial because it influences your choices. Dampening materials like foam absorb sound waves, making your recordings clearer by minimizing reverb and echo. However, they do little to prevent external noise from entering or your sound from leaking out—think of them as internal noise controllers. Soundproofing, on the other hand, involves adding mass, sealing gaps, and insulating to prevent sound transfer. This is more complex and often more expensive but necessary if you need isolation from noisy environments. The tradeoff is that true soundproofing can be bulky and costly, while dampening is simpler but less effective at blocking sound transmission. Recognizing what you need helps you allocate your budget and effort more wisely.

8 Pack - Bass Traps Acoustic Foam Corner, 8''x8''x12'' Black Bass Traps Corner Studio Foam, High Density and Fire-Proof Acoustic Panels Recording Studio Acoustical Treatments
Acoustic Principle- Bass Trap is a kind of sound absorbing structure specially used to absorb specific low-frequency standing...
As an affiliate, we earn on qualifying purchases.
As an affiliate, we earn on qualifying purchases.
Where to Place Acoustic Treatments for Maximum Impact
Placement beats coverage every time. Start with the mic position. Aim the mic at the least reflective spot—the corner opposite the door or the wall behind your head. Use a reflection filter or a portable panel to block sound bouncing from nearby surfaces.
Next, treat the first reflection points—these are the spots where sound bounces directly into your mic from walls and ceiling. Use a mirror to find these spots—sit in your recording position, have a friend move a mirror along the wall, and mark where you see the mic’s reflection.
Don’t forget the door. Sealing gaps with weatherstripping and hanging blankets can significantly cut leakage. If your closet has hard corners, add bass traps or thicker panels there to tame low-end buildup.
Proper placement of acoustic treatments is vital because it directly influences the clarity and naturalness of your recordings. Well-placed panels absorb sound at the right points, preventing reflections that muddy your audio. Misplaced treatments, however, can lead to uneven sound, with some frequencies overly damped and others still bouncing around. The key is understanding the room’s acoustic behavior and targeting the most problematic reflection points, which often requires some experimentation and listening tests.

HomeProtect Door Draft Stopper 36 Inch Under Door Draft Blocker Door Sweep for Bottom of Door Reduce Cold Air, Soundproof, Light, Odor, Weather Stripping Door Seal Strip Fit for Interior/Exterior
[Affordable]Single-side door draft stoppers are generally less expensive than double door draft stoppers. Our door draft stopper is...
As an affiliate, we earn on qualifying purchases.
As an affiliate, we earn on qualifying purchases.
The 'Rig in the Closet' Setup — How to Keep It Cool and Quiet
Putting your high-power rig in a closet sounds perfect—quiet, out of sight—but heat is the biggest challenge. A sealed space traps heat just like a sealed computer case, causing temperatures to soar and fans to scream.
To prevent overheating, add active ventilation—like a quiet exhaust fan or a small vent with a duct. A purpose-built soundproof cabinet combines foam with ducted airflow and temperature control, making it a serious investment [2].
For DIY, install a small, quiet fan that pulls hot air out and brings in cooler air. Keep an eye on ambient temperature—once it hits 85°F, your GPU and CPU will throttle, and noise comes roaring back. Remember, overheating can not only damage your equipment but also cause thermal noise and reduce the lifespan of your components. Balancing cooling with noise reduction is about choosing the right fan and designing airflow paths that don't introduce additional noise or vibrations.
Read more about cooling in this guide.
Sealing Gaps and Doors — The Quietest Secret to Better Sound
Most noise leaks through gaps around the door or vents. Sealing these is a game-changer. Use weatherstripping, acoustic sealant, or hang a thick blanket over the door to block sound escape.
Imagine your closet door as a sieve—air and sound seep through every crack. Sealing these holes can cut noise transmission by 20-30% in some cases.
But it’s not just about sealing; it’s about understanding that every gap acts as a weak point in your sound isolation. Properly sealing and insulating these openings prevents sound from leaking out and external noise from entering, which is especially important if you’re recording in a noisy environment or need to keep sound from disturbing others. Combining door sealing with other treatments, like adding mass or using soundproof curtains, enhances overall effectiveness. The tradeoff is that overly sealed spaces may trap heat or humidity, so ventilation must be considered simultaneously.
Common Mistakes to Avoid When Turning a Closet Into a Studio
Don’t treat only the corners—sound reflects everywhere. Don’t place your mic too close to reflective surfaces like shelves or windows. And never ignore the door or gaps.
Also, avoid over-relying on foam panels alone. They help with echo but don’t stop sound leaks. Small rooms also cause low-end buildup—adding bass traps helps tame that problem.
For instance, a user once hung foam panels only on the ceiling, but still had muffled, boomy vocals because the walls and door weren’t sealed. This highlights the importance of a holistic approach—focusing on reflection points, leaks, and low-frequency control to achieve a balanced, professional sound quality.
Affordable DIY Ideas for a Quiet Closet Studio
You don’t need to spend a fortune. Use moving blankets, thick rugs, and cardboard or foam panels. Combine these with sealing gaps and positioning your mic properly.
For example, a hobbyist built a budget booth with $50 worth of blankets and some old curtains. It’s not perfect, but it’s miles better than a bare closet.
Check out this article for more tips on affordable treatment options.
Dealing with Low-End Buildup and Standing Waves in Small Closets
Small rooms are prone to bass buildup, creating a muddy, boomy sound. The key is to break up standing waves. Use bass traps in corners and position your mic away from parallel surfaces.
If your closet has two walls facing each other, adding thick panels or bass traps at the corners reduces low-frequency resonance. Moving your mic slightly off-center can also help.
In a real-world case, a musician placed bass traps in the closet corners and noticed a clear improvement—less boom, more clarity.
Understanding how low frequencies behave in small spaces is crucial because they tend to accumulate and create resonances that color your recordings. Strategic placement of bass traps helps absorb these problematic frequencies, but it’s also important to consider the room’s geometry. Sometimes, even small adjustments—like angling panels or changing mic position—can significantly improve the sound by disrupting standing wave patterns.
Frequently Asked Questions
What is the difference between acoustic dampening and soundproofing?
Acoustic dampening reduces echo and reflections inside a space, making recordings clearer. Soundproofing blocks sound from leaking in or out. Both are important, but they serve different purposes—dampening is about sound quality, soundproofing is about isolation.
How much treatment do I need for a closet booth?
Start with treating the first reflection points, sealing gaps around the door, and adding a reflection filter behind the mic. Bass traps are optional but helpful if you notice boominess. You don’t need to cover every inch—target the main reflection and leak points for best results.
Where should I place acoustic panels in a closet?
Place panels at the first reflection points—use a mirror to find these spots. Also, put some on the ceiling and behind the mic. The goal is to absorb sound bouncing directly into your mic and reduce echo within the space.
Should I use foam panels or blankets?
Both work—foam panels are more durable and targeted, but blankets are cheap and easy to hang. For a budget setup, layered blankets over foam panels can do a great job, especially if you seal gaps and treat reflection points.
Can a closet sound professional or just budget-friendly?
It can sound very professional if you treat reflection points, seal gaps, and ventilate properly. While it’s not a full studio, a well-setup closet can produce studio-quality vocal recordings for most applications.
Conclusion
Your closet can become a surprisingly good studio—if you focus on placement, sealing gaps, and ventilation. It’s not just about stuffing foam; it’s about thinking how sound travels and how heat escapes.
Next time you consider noise or echo, remember: a little planning goes a long way. Your quiet, professional-sounding space is just a few smart moves away—so get to work, and enjoy the silence.